HomeRandolph Lucas created on 2008-02-22 updated on 2020-05-19
Introduction:
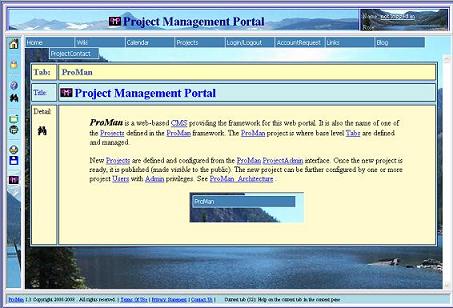
Pro Man (short for Pro ject Man agement Portal) is designed to provide a high-performance standardized CMS / Web Top oriented web site for projects.
The Pro Man_ Architecture takes advantage of LAMP technology making it fast, easy to deploy and easily extended.
Pro Man offers several key `off-the-shelf` features served up to public as well as credentialized Users having specific Roles :
- Public (no account necessary)
- Home
- Projects
- AccountRequest
- Login/Logout
- Links
- Wiki
- Registered Users (holding a Pro Man account)
- Schedule
- Calendar
- Documents publisher
- Reports publisher
- Contacts List
- Feedback
- Tools
- Links
- Administrators (super users via the Admin master tab)
- Tabs manager
- Users manager
- Roles manager
- Projects manager
- Database
- System
- Questionnaire
- Database Query
- Control System
- Data Edits
These features are immediately available for loading a Projects content, i.e. no low-level PHP or Database programming required.
The Pro Man Admin assigns Roles to its username-password authenticated Users and assigns the Users to one or more Projects to allow or deny access as appropriate to the Pro Man information and toolset.
In order to heighten security on tab content, Pro Man displays virtually all content in its content panel.
You should use the browser`s back button to navigate back to previous windows when the tab you are working with has multiple content tiers. Clicking on the tab will return you to the bottom tier.
- Projects (List of ProMan Projects
 ) )
- Families (Families)
This area is set aside for families to provide a web interface to their members. A family site may have areas that are private to the family as well as areas which are open to the public. Role and user based access control to the family web portal tabs is tightly enforced.
- EddieLucasFamily (Eddie Lucas Family of Benson, NC)
LUCAS - <a style='text-decoration:none; color:black;' href='javascript:SetTab(52,4202,0);' title='Husband, wife and children'>Family</a>

|
- Eddie
- Ilee
- Bobby
- Carolyn
- Randy
- Roger
- JoAnn
- Gail
- Evelyn
|
- Individuals (Individuals)
This area is set aside for individuals to provide a web interface to their friends and the general public. An individual site may have areas that are private to the individual as well as areas which are open to the public. Role and user based access control to the individual web portal tabs is tightly enforced.
- JonathanLucas (Jonathan Edward Lucas)
- JudyLucas (Judy R. Lucas of Benson, N.C.)
- LizLucas (Elizabeth Lucas)
|
|
|
Liz is a Christian, a wife of 5 years, a mother of a 4 year old, a homemaker and a trained theatrical performer. |
- MichaelLucas (Michael Avery Lucas)
|
|
Michael Avery Lucas originally of Apex, N.C. Now lives in Denver CO. |
- RandyLucas (Randolph Lucas of Benson, N.C.)
- ProMan (Project Management Portal)
- Businesses (Businesses (money changes hands))
This area is set aside for legitimate businesses to provide a web interface to their business operations. Operations include management activities as well as those directed to their clients. A business site may have areas that are private to the business as well as areas which are open to the public. Role and user based access control to the business web portal tabs is tightly enforced.
- Graith (Graith Ministries )
- LucasCo (Lucas Companies)
- 7LProductions (7L Productions Specializes in Gospel Music and Videos)

7L Productions is a Lucas Company focusing on performances and record production.
- LampLite (LampLite Computing Services)
- LucasProperties (Lucas Properties)
- MaxVac$ (Maximum Vacation$)
- WildBlueYonder (Wild Blue Yonder Home Page)
Wild Blue Yonder
site provides information and products for this bluegrass-gospel group.
- WordNote (Word Note)
- BAMA (Benson Area Ministerial Association)
- Churches (Churches)
This area is set aside for Christian churches to provide a web interface to their church operations. Operations include management activities as well as those directed to the public. A church site may have areas that are private to the church as well as areas which are open to the public. Role and user based access control to the church web portal tabs is tightly enforced.
- NLPC (New Life Pentecostal Church)
- Purchase (Items available for Purchase )
- LogInOut (Login, logout, change your password or get new password)
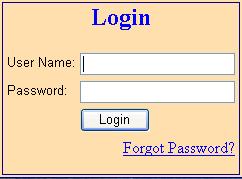
The Login/Logout tab enables Users to log into Pro Man. It is accessed using the  button. button. From the login screen:
- you can change your password
- you can request a password reminder
Once logged in, the Pro Man portal menus are updated to show all the Tabs accessible for the logged in user based on the Roles of the Tabs with respect to the user`s role.
- Mobile (Mobile trigger)
Not used:
MobileToggle.php
- MobilePage (A Mobile view of the LucasCo pages)
- MobilePageX (A Mobile view of the LucasCo pages)
- Admin (Portal Adminstration Tools)
- SiteExplorer (Explore ProMan site)
- System (WebMin System Administration)
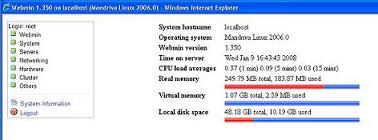
The System tab accesses the Web Min System Admin tool.
- CalendarEmail (Program to send email of tomorrows events)
- CalendarText (Program to send text of appointments)
- DeBug_Clear (Clear ProMan debug information)
- DeBug_View (ProMan debug viewer)
- SessionControl (Session control variable settings)
- SystemInfo (System Information)
- SystemVars (System variables)
- Tabs (View or modify details or add new tabs to the portal)
The Tabs tool enables Users with Admin privileges to add, modify or disable Tabs. A Tab is an item on the Pro Man portal menu which should contain at a minimum, some help text, and may have internal or external Links associated with it. It has other attributes identifying where in the project menu it appears as well as what Users through their Roles have access to it. The project Admin has privilege to all Tabs. However, other Users have privilege to add and modify Tabs in a controlled fashion (see Documents , Reports , Links , Tools ). This is the primary tool the Admin uses to shape the project`s Pro Man site. You can: - Add, `Update` or `Delete` tabs
- Move them in the project menu
- Disable or enable them
- Make them visible or invisible
- Enter Help text about the tab module
- Identify the Roles that may access the tab
To add a new tab: - Click on the Add button
- An item called New Tab will appear at the bottom of the menu panel.
- The New Tab is automatically selected for editing.
- You can then enter or change any of the attributes of the tab
- To upload a document or program and associate it with your new tab:
- Click on the binoculars
- A File Upload dialog will pop up.
- Click on Browse to locate the file you wish to updload
- Click on Upload to upload the file to the project upload site
- Click on Continue after the file has been uploaded
- Click on Update to save the uploaded file name to the tab
- Once a file name appears in the target field clicking on the binoculars will display the target
- To upload a new file, you must clear the target field and click on Update .
- To save your updates, click on Update
- The Description field also serves as help content. So, make sure that it is sufficient for that purpose. Use HTML to format the description.
- Use the lower portion of the right panel to control where the document will appear in the project sitemap. You can move the tab to a different parent. You can also move it to a particular place under a parent with multiple children using the up and down arrows.
- Lastly, make sure the role-based security is set appropriately for the document.
Tabs are stored in the Pro Man Database. 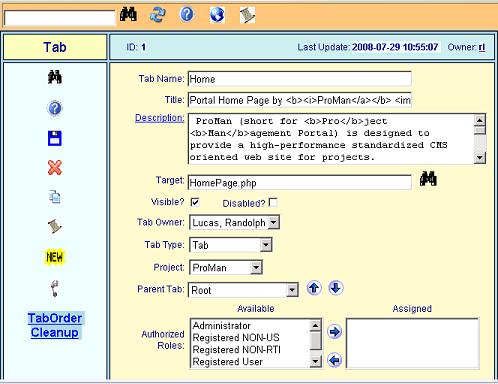
- AnnouncementAdmin (Announcement Admin Tool)
The Announcement Admin tab enables adding, removing and re-ordering Accouncement items by Users assigned the Programmer role.
The left panel of the Announcement Admin form enables you to see all the Anncouncement items defined for your project.
You can add new Announcement items by doing the following:
- Click on the Add button
- An item called New Tab will appear at the bottom of the menu panel.
- The New Tab is automatically selected for editing.
- You can then enter or change any of the attributes of the Announcement tab
- To upload a Announcement document and associate it with your new tab:
- Click on the binoculars
- A File Upload dialog will pop up.
- Click on Browse to locate the document you wish to updload
- Click on Upload to upload the document to the project upload site
- Click on Continue after the file has been uploaded
- Click on Update to save the uploaded file name to the tab
- Once a file name appears in the target field clicking on the binoculars will display the target
- To upload a new file, you must clear the target field and click on Update .
- To save your updates, click on Update .
- The Description field also serves as help content. So, make sure that it is sufficient for that purpose. Use HTML to format the description.
- Use the lower portion of the right panel to control where the report will appear in the project sitemap. You can move the tab to a different parent. You can also move it to a particular place under a parent with multiple children using the up and down arrows.
- Lastly, make sure the role-based security is set appropriately for the report.
The Announcement Admin is similar to the Tabs Admin shown below:
- BlogAdmin (Blog Administrator)
The Blog Admin tab enables adding, removing and re-ordering Blog items by Users assigned the Admin role.
The left panel of the Blog Admin form enables you to see all the Blog items defined for your project.
You can add new Blog items by doing the following:
- Click on the Add button
- An item called New Tab will appear at the bottom of the menu panel.
- The New Tab is automatically selected for editing.
- You can then enter or change any of the attributes of the Blog tab
- To upload a Blog document and associate it with your new tab:
- Click on the binoculars
- A File Upload dialog will pop up.
- Click on Browse to locate the document you wish to updload
- Click on Upload to upload the document to the project upload site
- Click on Continue after the file has been uploaded
- Click on Update to save the uploaded file name to the tab
- Once a file name appears in the target field clicking on the binoculars will display the target
- To upload a new file, you must clear the target field and click on Update .
- To save your updates, click on Update .
- The Description field also serves as help content. So, make sure that it is sufficient for that purpose. Use HTML to format the description.
- Use the lower portion of the right panel to control where the report will appear in the project sitemap. You can move the tab to a different parent. You can also move it to a particular place under a parent with multiple children using the up and down arrows.
- Lastly, make sure the role-based security is set appropriately for the report.
The Blog Admin is similar to the Tabs Admin shown below:
- LinkAdmin (Link Administrator)
The Link Admin tab enables adding, removing and re-ordering Links by users assigned the Programmer role. You can publish any Link by referencing the Link in the target field. The left panel of the Link Admin form enables you to see all the Links defined for your project.
You can add new Links by doing the following: - Click on the Add button
- An item called New Link will appear at the bottom of the menu panel.
- Click on New Link to select it
- You can then edit any of the attributes of the Link tab
- To save your updates, click on Update
- The Description field also serves as help content. So, make sure that it is sufficient for that purpose. Use HTML to format the description.
- Use the lower portion of the right panel to control where the Link will appear in the project sitemap. You can move the tab to a different parent. You can also move it to a particular place under a parent with multiple children using the up and down arrows.
- Lastly, make sure the role-based security is set appropriately for the Link.
The Link Admin is similar to the Tabs Admin shown below:
- ProjectAdmin (Administer the current project or create a new project)
ExecuteSQLit sql=
select text,id,book,chapter,verse,ref,vod,strong,anchor,translated,jesus,bookshort,bookfull,testament from where bookshort='Pro' and instr(text,'project')>0 and instr(text,'tab:')>0
You have an error in your SQL syntax; check the manual that corresponds to your MariaDB server version for the right syntax to use near 'where bookshort='Pro' and instr(text,'project')>0 and instr(text,'tab:')>0' at line 1
|